Mastering The Cursive F: Your Guide To Writing A Beautiful 'f' In Cursive
Have you ever looked at elegant handwritten notes and wished your own script had that same lovely flow? It's a pretty common feeling, actually. Learning to write letters in cursive, like the graceful 'f', can feel a bit like learning a secret code, or perhaps, a special dance for your pen. There's a real joy that comes with making those smooth, connected strokes, and it's something many people want to experience.
For a lot of us, the idea of picking up a pen and creating something beautiful on paper holds a certain charm. It’s more than just putting words down; it’s about expressing yourself with a personal touch. So, when you think about the letter 'f' in cursive, you might picture those looping lines, the way it connects to other letters, and just how much it can make your writing stand out. It really is a distinctive letter, you know.
This article is going to walk you through everything you need to know to truly get a handle on the cursive 'f'. We'll look at both the big and small versions, talk about how to hold your pen just right, and even point out some little things that can sometimes trip people up. By the time we're done, you'll have a much clearer idea of how to make your 'f's look fantastic, and that's the whole point, isn't it?
Table of Contents
- Getting Ready for Cursive: Posture, Grip, and Paper Position
- The Lowercase 'f' in Cursive: A Gentle Start
- The Uppercase 'F' in Cursive: Making a Grand Statement
- Avoiding Common Mistakes with the Cursive 'f'
- Practice Makes Perfect: Tools for Your Journey
- The D'Nealian Font and Your Cursive 'f'
- Why Improve Your Cursive 'f'?
- Frequently Asked Questions About the Cursive 'f'
- Your Next Steps in Cursive Writing
Getting Ready for Cursive: Posture, Grip, and Paper Position
Before you even put your pen to paper, there are a few things you can do to set yourself up for success. It's really like getting ready for any activity that needs some precision, you know? The way you sit, how you hold your pen, and even where your paper sits can make a big difference in how easily you learn to write the 'f' in cursive.
First off, think about your posture. Sitting up straight, with both feet flat on the floor, can help you feel more balanced and in control. Slouching, you see, can make your arm and hand feel a bit awkward, which might make those smooth cursive strokes a little harder to manage. A good, upright position, in some respects, gives your writing arm the freedom it needs.
Then there's the pencil grip. This is a very important part, actually. You want to hold your pen in a way that feels comfortable but also gives you enough control. Typically, a relaxed grip, where your fingers aren't squeezing too tightly, works best. Your index finger and thumb usually hold the pen, with your middle finger offering some support underneath. This kind of grip, you know, allows for fluid movement, which is pretty essential for cursive.
Finally, consider your paper position. Often, tilting your paper slightly, especially if you're right-handed, can make it easier to see what you're writing and to create those upward and downward strokes. If you're left-handed, you might find a different angle works better for you. The goal, after all, is to find a position that lets your hand move naturally across the page without any strain. It's all about comfort and control, really.
The Lowercase 'f' in Cursive: A Gentle Start
The lowercase 'f' in cursive is a letter that often catches people's attention because of its unique loops. It’s a bit different from many other letters, and that's what makes it so interesting to learn. Getting this letter right can really add a touch of elegance to your overall cursive handwriting, you know. It's a key player, in a way, for fluency.
Many people find that practicing the lowercase 'f' helps them with other letters, too, because it involves movements that build good pen control. It has both an upper loop and a lower loop, which means your hand gets a good workout moving in different directions. This practice, you see, helps develop that muscle memory needed for smooth writing. It's almost like a mini exercise for your hand.
When you learn this letter, you'll see how it connects beautifully to letters both before and after it. This connection is what makes cursive so fluid and continuous. Understanding the starting and ending points of the lowercase 'f' is pretty important for making your words look neat and joined up. It truly is a foundational letter for cursive flow.
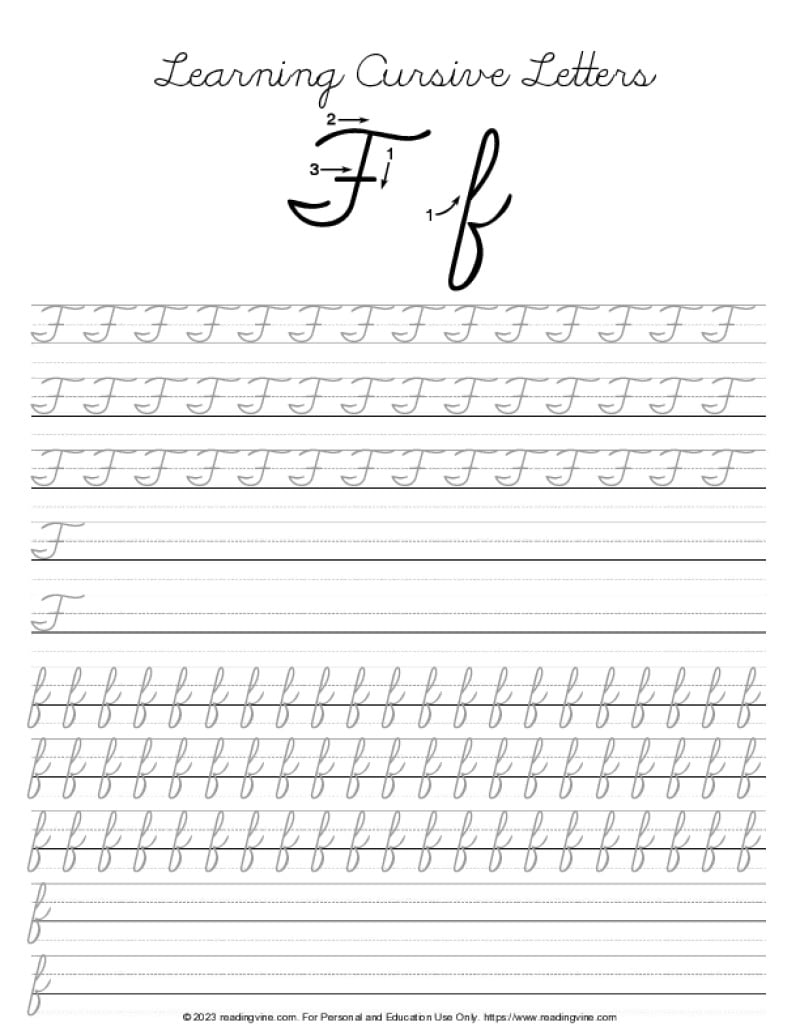
Learning with a quick animation can make the process much clearer, actually. Visual aids, like a video showing the strokes, help you see the exact path your pen should take. Then, using a free PDF worksheet allows you to trace and practice those movements over and over. This combination of seeing and doing, you know, really solidifies the learning. It's a powerful way to pick up new skills.
Step-by-Step: Crafting the Lowercase 'f'
Let's break down how to create that lovely lowercase 'f'. It might seem a little tricky at first, but with clear steps, you'll get it. We're going to start from the bottom line, which is pretty typical for many cursive letters, as a matter of fact.
- Start on the Baseline: Begin your stroke on the bottom writing line. This is your starting point for a lot of letters, so it's a good place to remember.
- Up to the Top Line with a Loop: From the baseline, make a gentle upward curve, like you're heading towards the top writing line. As you reach the top, make a small, open loop that goes back down to the right. This loop, you know, is one of the signature parts of the 'f'.
- Down Through the Baseline: After completing that top loop, continue your stroke downwards, crossing the baseline and going a bit below it. You're creating a stem that dips into the space below the main writing area.
- Form the Lower Loop: Once you're below the baseline, make another loop. This one goes to the left and then curves back up, crossing the downward stem you just made. This lower loop, you see, is what gives the 'f' its distinctive balance.
- Finish with a Connecting Stroke: After the lower loop crosses the stem, continue the line upwards, curving to the right. This stroke usually ends around the middle writing line, ready to connect to the next letter. This final flourish, in some respects, prepares the letter for its neighbors.
Remember, the key is to keep your hand moving smoothly throughout these steps. It's not about drawing the letter in pieces; it's about making one continuous, flowing motion. That's really what cursive is all about, isn't it?
Connecting the Lowercase 'f' to Other Letters
Connecting the lowercase 'f' is a pretty neat part of the process. The way it joins up with other letters is what makes cursive writing so fluid and elegant. You'll notice that the connecting stroke, the one that comes off the lower loop, usually rises to meet the next letter around the middle line. This is where the magic happens, so to speak.
For example, if you're writing "of," the ending stroke of the 'o' would flow directly into the beginning of the 'f'. Then, the finishing stroke of the 'f' would naturally lead into the next letter, which in this case, might be a 'g' or an 'i'. It's all about keeping that pen on the paper for as long as you can, creating a continuous line of thought, you know.
Sometimes, people find the connections a bit challenging, especially when the 'f' needs to join a letter that starts low, like an 'a', or one that starts high, like an 'l'. But with practice, you'll start to feel the rhythm of these connections. It’s a bit like learning to dance with your pen, honestly. Each letter has its own little step, and the connections are the transitions between them.
Watching videos that show these connections in real-time can be incredibly helpful. You get to see exactly how the pen moves from one letter to the next, which is pretty hard to describe with just words. Then, trying it out on a worksheet lets you mimic those movements yourself, building that crucial muscle memory. It really does make a difference, you know, seeing it in action.
The Uppercase 'F' in Cursive: Making a Grand Statement
Now, let's talk about the uppercase 'F' in cursive. This letter is often seen as quite majestic, with its bold strokes and distinct crossbar. It's definitely a letter that commands attention, especially at the beginning of a sentence or a name. Learning to write it well can add a real sense of polish to your cursive, you know.
The uppercase 'F' tends to be a bit more elaborate than its lowercase counterpart, which is pretty common for capital letters in cursive. It often involves a few more lifts of the pen or more complex curves, but the result is usually worth the effort. It's almost like creating a little piece of art each time you write it, in some respects.
Just like with the lowercase 'f', practicing the big 'F' helps strengthen your overall pen control. You'll be making larger, sweeping motions that engage your whole arm, not just your fingers. This kind of practice, you see, is really good for developing a confident and consistent hand. It's a way to improve your writing control and fluency, as a matter of fact.
Using resources like the Letter School app, as mentioned in my text, can be a fun way to practice writing big and small letters. These apps often provide interactive guidance, showing you where to start and how to move your pen. It's a modern approach to an old skill, and it can be quite engaging, honestly, for learners of all ages.
Step-by-Step: Mastering the Uppercase 'F'
Creating the uppercase 'F' involves a few distinct movements that, when put together, form a truly impressive letter. It might look a bit complex, but if you take it one step at a time, it becomes much more manageable. We'll start from the top, which is pretty standard for most capital letters.
- Begin with a Top Loop: Start near the top line, perhaps a little to the left. Make a graceful, sweeping loop that goes upwards and then curves down to the right. This initial loop, you know, sets the stage for the rest of the letter.
- Descend with a Straight Line: After the top loop, bring your stroke straight down towards the baseline. This line should be fairly vertical and strong, giving the 'F' its main structure.
- Form the Base Curve: As you approach the baseline, curve your stroke gently to the left, then bring it back up to the right, creating a small, elegant curve at the bottom. This little curve, you see, provides a stable base for the letter.
- Add the Crossbar: Now, lift your pen. Go back to the middle of the main vertical stroke you just made. From there, draw a horizontal line that crosses through the vertical stem. This crossbar, in a way, completes the classic 'F' shape. It's what makes it instantly recognizable.
- Optional Flourish (if desired): Some styles of uppercase 'F' might include a small, decorative loop or curve at the end of the crossbar or at the very top. This is more of a personal touch, but it can add a bit of flair.
The trick with the uppercase 'F' is to ensure that the main vertical stroke is quite prominent and that the loops are well-formed. It's about balance and proportion, really. Don't be afraid to take your time with each part, and remember that practice will make your strokes more confident. It truly does make a difference, you know, the more you try it.
Connecting the Uppercase 'F' to Other Letters
Connecting the uppercase 'F' is a little different from connecting lowercase letters, primarily because it often doesn't have a direct, continuous connecting stroke that flows into the next letter without lifting your pen. This is pretty common for many capital letters in cursive, actually. They often stand alone, or they connect in a more subtle way.
Typically, after you've completed the uppercase 'F', you would lift your pen. Then, you would begin the next letter, which is usually the first letter of a name or a word, slightly to the right of the 'F'. The connection, in this case, is more implied than physically drawn. It’s a visual link, you know, rather than a continuous line.
However, some cursive styles might have a very slight, almost invisible, connecting stroke that comes off the bottom curve of the 'F' and leads into the next letter. This is less common, though, and often depends on the specific font or teaching method. For instance, the D'Nealian font might have particular ways of showing these connections, which are worth looking into.
The main thing to remember is that the uppercase 'F' is a strong, independent letter. Its purpose is to start a word with impact, and it doesn't always need to be physically joined to the following letters to look good. The visual proximity and consistent spacing, you see, are what create the sense of connection. It's all about the overall appearance of the word, really.
Avoiding Common Mistakes with the Cursive 'f'
When you're learning to write the 'f' in cursive, it's pretty normal to run into a few common snags. Everyone does, honestly. But knowing what these typical mistakes are can help you spot them in your own writing and fix them more quickly. It's almost like having a little roadmap to avoid the bumps, in a way.
One frequent issue is making the loops too small or too large. If the loops are too tiny, the 'f' can look cramped and hard to read. If they're too big, the letter might seem out of proportion with the other letters in your word. The goal, you know, is to find a balance where the loops are open enough to be clear but not so expansive that they dominate the letter. It's about finding that just-right size.
Another common mistake involves the vertical stem. Sometimes, people don't bring the stem down far enough below the baseline for the lowercase 'f', or they make it too wobbly for the uppercase 'F'. A strong, relatively straight vertical line is pretty important for both versions of the letter. It gives the 'f' its backbone, you see.
Then there's the issue of consistency. It's easy for your 'f's to look different each time you write them, especially when you're just starting out. One might be wide, another narrow, one loop might be round, another more oval. The key to overcoming this is consistent practice, paying attention to the shape each time. That's really how you build that muscle memory for a uniform look. Avoid common mistakes and master the cursive 'f' stroke with D'Nealian font, for instance, which often provides very clear guidelines.
Finally, sometimes the connections to other letters can be a bit awkward. The ending stroke of the 'f' might not meet the next letter smoothly, or it might be too short or too long. Focusing on the flow and making sure your pen continues its motion without abrupt stops can help with this. It's about making each letter a part of a larger, continuous line, you know, like a chain.
Practice Makes Perfect: Tools for Your Journey
Learning any new skill, especially something like cursive writing, really benefits from consistent practice. It’s not something you master in just one sitting, you know. The more you put pen to paper, the more your hand gets used to the movements, and the more natural and fluid your 'f' in cursive will become. This is where the right tools can make a big difference.
One of the best ways to practice is by using free cursive worksheets. These are fantastic because they often provide tracing exercises, which help you get the feel of the strokes without having to worry about forming the letter from scratch. You can download free cursive worksheets to improve writing control and fluency, as a matter of fact. They're a really accessible resource.
Beyond worksheets, videos are incredibly helpful. A video that begins with a fun animation with the featured letter before demonstrating the basics of proper posture, pencil grip, and paper position, as mentioned in my text, can give you a clear visual guide. Seeing the letter being formed in real-time, stroke by stroke, helps you understand the rhythm and flow. It's almost like having a personal tutor showing you the ropes.
![Cursive F [Letter F Worksheet + Tutorial]](https://mycursive.com/wp-content/uploads/2020/10/f.png)
Cursive F [Letter F Worksheet + Tutorial]
Letter F In Cursive

Cursive Letter F
