How To Tie A Bow With Ribbon: Simple Steps For Stunning Creations Today
Learning how to tie a bow with ribbon can honestly transform how you present gifts, decorate your home, or even add a special touch to craft projects. It's a skill that, you know, just seems to add a bit of elegance and thoughtfulness to nearly anything. Many people, it seems, feel a little intimidated by this task, thinking it requires some kind of secret talent. But, really, it's more about following a few simple steps and, well, a little practice.
So, if you're looking to make your gift wrapping look truly fabulous, or perhaps you want to add a beautiful flourish to a handmade card, this guide is, like, for you. We're going to explore how to tie a bow out of ribbon in an easy way, making sure your creations turn out perfectly every time. You’ll find that, in just a few minutes, you can have a lovely bow that’s, you know, really perfect for decorating or wrapping packages, which is pretty cool.
This article, actually, will walk you through various methods, from the classic gift topper to a fancy bow that’s, in some respects, ideal for craft projects such as handmade cards and scrapbook layouts. We'll cover everything you need, from selecting your ribbon to, like, finishing it with neat fishtails. So, get your favorite ribbon, a pair of scissors, and maybe some chenille stems ready, because we're about to make some beautiful bows.
Table of Contents
- Gathering Your Bow Tying Essentials
- Picking the Perfect Ribbon for Your Project
- The Classic Gift Bow: A Step-by-Step Guide
- Crafting Smaller Bows for Cards and Scrapbooks
- Tying a Fancy Bow: Adding Extra Flair
- Tips for Tying a Perfect Bow Every Time
- Creative Ways to Use Your Beautiful Ribbon Bows
- Common Bow Tying Mistakes and Simple Fixes
- Frequently Asked Questions About Tying Ribbon Bows
Gathering Your Bow Tying Essentials
Before you, you know, start tying, it’s a good idea to have your tools ready. Basically, all you need is your favorite ribbon and a good pair of scissors. For some fancier bows, you might, too, want to have some chenille stems on hand. These items are, in fact, the core of making any ribbon bow, whether it's for a gift or a craft project.
Choosing the right ribbon is, actually, a big part of the process. You'll find ribbons come in so many different materials and widths. The type you pick will, like, really influence the final look and feel of your bow. So, think about what you want your bow to do and where it will go.
Picking the Perfect Ribbon for Your Project
The kind of ribbon you choose, you know, really matters. Some ribbons hold their shape better, while others have a softer, more flowing look. Understanding these differences can, like, make your bow-tying experience much easier and, in a way, more successful.
Thin vs. Thick Ribbon
These simple bows, for instance, can be made using thin or thick ribbon. Thin ribbon is, you know, great for delicate touches, like on a small gift or a card. It tends to be a little more forgiving if you're just starting out. Thick ribbon, on the other hand, makes a bolder statement. It's often used for larger gifts or wreaths, where you want the bow to, like, really stand out.
When you're working with thicker ribbon, you might find it, well, requires a bit more effort to shape the loops. But the result is, often, a very full and luxurious bow. Thin ribbon, however, can be, like, layered for a similar effect without being too bulky, which is pretty neat.
The Magic of Wired Ribbon
Wired ribbon is, honestly, a real game-changer for bow tying. It has thin wires along its edges, which, you know, allow you to shape and hold the loops exactly how you want them. This is, in fact, incredibly helpful for creating bows that have a lot of volume and structure. If you want a bow that looks, like, really professional and keeps its form, wired ribbon is, usually, the way to go.
Non-wired ribbon, by the way, creates a softer, more fluid bow. It's lovely for a more natural look, or when you want the ribbon to drape gently. Both types have their place, so, you know, experiment to see what you like best for different projects.
The Classic Gift Bow: A Step-by-Step Guide
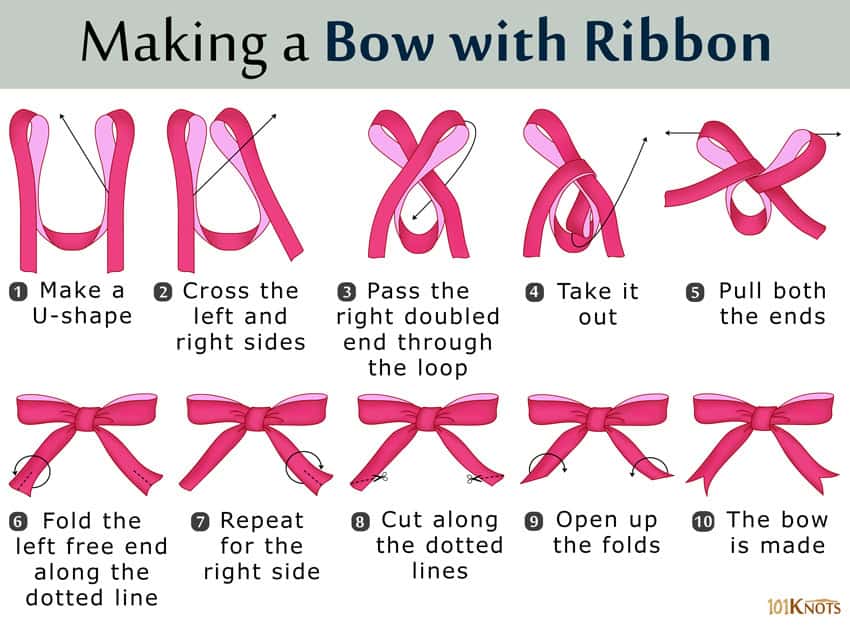
The classic bow is, arguably, one of the first bows you learned to tie. It's still a timeless gift topper, and, well, it’s probably the most common type you’ll make. Our steps below explain how to make a bow out of ribbon perfectly every time, which is, like, pretty helpful.
Initial Placement and the First Knot
If you're tying a bow on the top of a package, you know, you'll want to loop the ribbon under the package first. Bring the ends together over the package, and, like, knot them together so the ends are equal in length. This initial knot is, actually, very important because it forms the base of your bow and helps keep it centered.
Make sure the knot is snug, but not so tight that it, you know, wrinkles the package. You want enough slack to work with the ends, but, you know, not so much that it feels loose. This step, frankly, sets up the whole bow, so take your time here.
Creating the Loops
Now, take one end of the ribbon and form a loop, which is, you know, essentially one side of your bow. Hold this loop in place with your thumb and forefinger. Then, with the other end of the ribbon, you'll create a second loop, passing it over the first loop and, like, threading it through the center hole you’ve made. This is, actually, very similar to tying your shoelaces.
The size of these loops, by the way, will determine how big your finished bow is. Try to make them, you know, roughly the same size at this stage. This helps ensure a balanced look, which is, usually, what you're aiming for.
Tightening and Shaping Your Bow
Once both loops are formed and threaded through, gently pull them tight. You want to pull them, you know, firmly but carefully, so the knot secures the loops without crushing them. This is where, like, you can really start to see your bow take shape.
After tightening, you can, you know, adjust the loops and tails. Fluff out the loops to make them full and round. If you're using wired ribbon, you can, like, really manipulate the loops to stand up or curl in a particular way. Make sure the tails are, you know, hanging nicely and are, ideally, the same length. This step, honestly, makes a huge difference in the final appearance.
Crafting Smaller Bows for Cards and Scrapbooks
This bow is, actually, ideal for craft projects such as handmade cards and scrapbook layouts. For these smaller applications, you often want a bow that lies flatter and is, you know, a bit more delicate. The technique is similar to the classic bow, but with a focus on smaller, neater loops.
You might, you know, use thinner ribbon for these projects. The goal is to create a charming accent, not, like, an overwhelming centerpiece. So, keeping the proportions small is, usually, the key here.
Using Chenille Stems for Craft Bows
For craft bows, especially if you want them to hold a very specific shape or attach them easily, chenille stems can, you know, be incredibly useful. You can, for instance, form your loops with the ribbon, and then use a chenille stem to tie them together in the middle, instead of using the ribbon itself for the knot. This allows you to, like, create multiple loops more easily and then use the stem to secure it to your project.
The chenille stem, by the way, can be twisted at the back to make a very secure knot, and then the excess can be trimmed or, you know, used to attach the bow. This method is, honestly, great for achieving a very neat and consistent look, which is, in fact, often desired for crafts.
Tying a Fancy Bow: Adding Extra Flair
Learn how to tie a fancy bow the easy way, you know, by adding a few extra steps to the basic technique. A fancy bow might involve more loops, different ribbon types, or, like, a special finish for the tails. The goal is to create something that, well, really stands out and catches the eye.
One way to make a bow fancier is to, you know, create multiple layers of loops. Instead of just two, you might make four or even six loops, which adds a lot of volume. You can, like, also combine different ribbons, perhaps a wide patterned one with a narrower solid one, for a very rich effect.
The Elegant Fishtail Finish
Katy, for instance, shows us how to tie the perfect ribbon bow and finish it with fishtails. This simple technique, you know, really elevates the look of your bow. To create a fishtail, you take the end of a ribbon tail and fold it in half lengthwise. Then, you cut at an angle from the folded edge towards the raw edge, creating a V-shape. When you unfold it, you'll have a neat, pointed "fishtail" end.
This finish, by the way, looks much more polished than just a straight cut. It's a small detail that, honestly, makes a big difference in how professional your bow appears. So, it's, like, a very worthwhile step for that extra touch of elegance.
Tips for Tying a Perfect Bow Every Time
Making a bow that looks, you know, truly perfect involves a few key considerations. These simple tips can, in fact, help you achieve a beautiful result consistently. Our steps below explain how to make a bow out of ribbon perfectly every time, and these tips are, you know, part of that process.
Keeping Tails Even
One common challenge is, you know, making sure the ribbon tails are the same length. After you make your initial knot, just a little adjustment to the ribbon ends before you form your loops can, actually, save you a lot of trouble later. If they're slightly off, you can, like, trim them at the very end, but starting with equal lengths is, usually, easier.
Sometimes, one tail might seem to, you know, slip a bit as you tighten the bow. Just gently pull on the shorter tail while loosening the other slightly, until they look, you know, balanced. It's, like, a bit of a dance, but you'll get the hang of it.
Adjusting Loops for Symmetry
Symmetry is, honestly, key to a beautiful bow. After you've tightened your knot, take a moment to, you know, gently pull and prod each loop. You want them to be, like, the same size and shape. If one loop looks a little smaller or flatter, you can, you know, carefully pull a bit more ribbon from the knot to enlarge it.
This is where wired ribbon, by the way, really shines, because you can literally mold the loops into position. With non-wired ribbon, you might, you know, need to be a little more patient and use your fingers to coax the fabric into shape. It's, like, a very satisfying part of the process.
Practice Makes Perfect
Like any skill, tying a beautiful bow, you know, gets easier with practice. Don't get discouraged if your first few attempts aren't, like, absolutely perfect. Just keep trying with different ribbons and for different purposes. You'll soon develop a feel for how the ribbon behaves and what techniques work best for you.
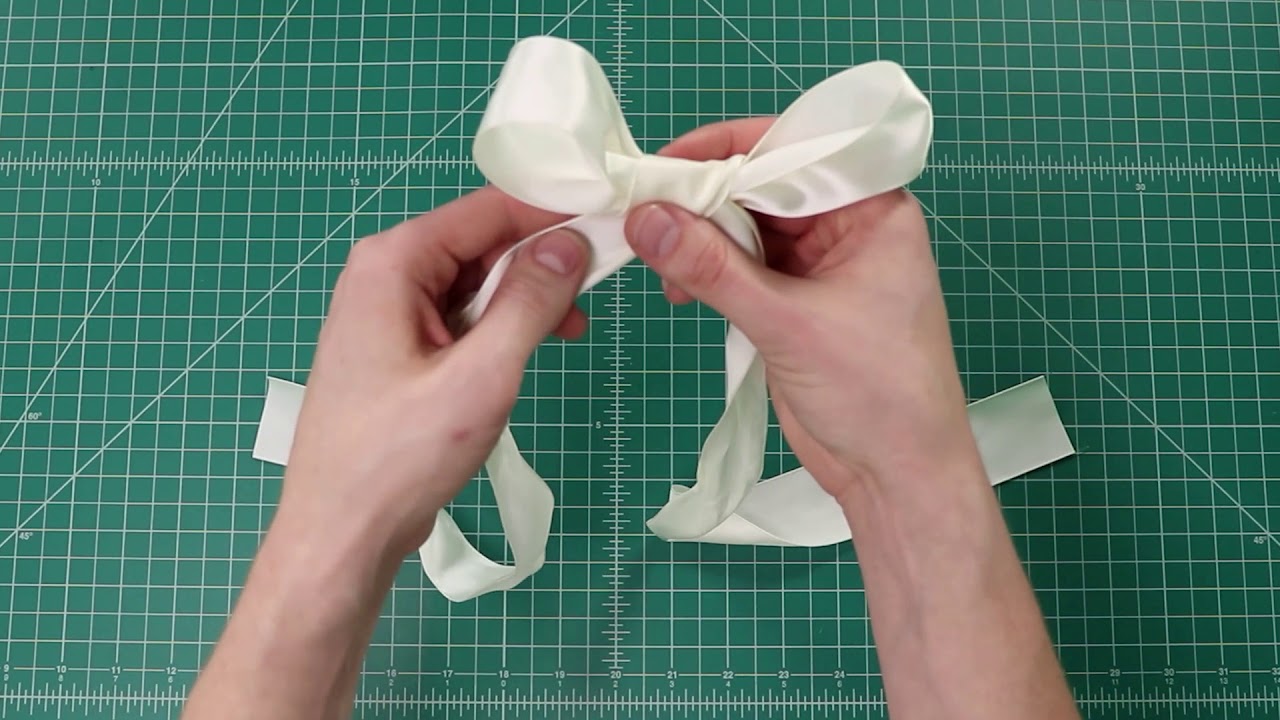
You might, you know, even want to watch a video or two. How to do a bow with ribbon video guides can, in fact, be very helpful for seeing the motions in real-time. So, don't hesitate to, like, look for visual aids if you feel you need them.
Creative Ways to Use Your Beautiful Ribbon Bows
In just a few minutes, you can have a beautiful bow that’s, you know, perfect for decorating, adding to wreaths, or wrapping packages. But the uses for your handmade ribbon bows, actually, go far beyond just gifts. These simple bows can be made using thin or thick ribbon, and they're, like, the perfect finishing touch for any number of projects.
Consider adding them to hair clips or headbands for a personalized accessory. They can, you know, also dress up plain baskets or jars, turning everyday items into something special. For seasonal decor, a well-placed ribbon bow can, in fact, really enhance the festive feel of your home. You can, you know, even use them to tie back curtains or adorn floral arrangements, which is pretty versatile. Learn more about ribbon crafting ideas on our site, and link to this page for more inspiration.
Common Bow Tying Mistakes and Simple Fixes
Even with the best intentions, you know, bows can sometimes go a little wrong. But, actually, most common problems have very simple solutions. Knowing what to look for can, in fact, save you a lot of frustration and, like, help you achieve that perfect bow.
One frequent issue is, you know, uneven loops. This often happens if you don't pull the ribbon through the knot evenly. The fix is, usually, to gently loosen the knot a little and then, you know, pull on the shorter loop to draw more ribbon from the longer side until they match. Another problem can be, you know, a loose knot that doesn't hold the loops firmly. This just means you need to, like, pull a bit tighter when securing the initial knot and the final pull.
Frayed ribbon ends are, you know, also a common sight. This can be avoided by using very sharp scissors and, you know, making clean cuts. For some ribbon types, especially satin, you can, like, lightly singe the very edge with a flame (carefully!) to prevent fraying, which is a neat trick. But, really, the best way to prevent fraying is to, like, cut cleanly in the first place.
Frequently Asked Questions About Tying Ribbon Bows
People often have a few questions when they're learning how to tie a bow with ribbon. Here are some common ones, you know, that might help you out.
How do I make my ribbon bow stand up and look full?
For a bow that stands up and looks full, you know, using wired ribbon is, like, your best bet. The wire in the edges allows you to shape each loop individually, making them hold their volume. Also, creating more loops, say four or six instead of just two, will, actually, add a lot of fullness to the bow, which is pretty effective.
What's the easiest way to keep the ribbon tails from slipping?
To keep ribbon tails from slipping, you know, making sure your initial knot is snug is, honestly, very important. When you tie the second knot to form the loops, pull it, like, firmly. For very slippery ribbons, a tiny dab of fabric glue or a small piece of double-sided tape on the back of the knot can, actually, help secure the tails in place, which is a handy little trick.
Can I tie a bow with very wide ribbon without it looking bulky?
Yes, you can, you know, tie a bow with very wide ribbon without it looking too bulky. The key is to, like, keep the number of loops minimal, perhaps just two. Also, ensure the loops aren't excessively long. If you're using wired wide ribbon, you can, you know, really shape the loops to be more open and airy, which prevents a heavy look. Sometimes, just a single, large loop on each side is, actually, all you need for a stylish, non-bulky wide ribbon bow.
How to Make a Bow with Ribbon? Tips & Step-By-Step Instruction

diy ribbon bow tie for gift wrapping in 2022 | Tie bows with ribbon, Bows for presents, Gift
How To Tie A Ribbon Around A Box And Make A Bow at Jordan Matson blog
